Project Module
The Project module of the GMS captures the information that is provided by an applicant when requesting funds as part of a grant application.
Prospective and continuing grantees can view, enter and print grant application information and instructions from the Internet for all grant programs with BJF. Further, the grantee can enter project information on-line and submit the grant application when it is completed.
After the applicant submits the grant, BJF staff has access
to the grant information and can process it.
Accessing the Project Grid
To access the GMS Project module, follow these steps:
ü Log in to the GMS.
ü Click on the Project link on the left frame of the GMS Welcome page. The Project grid will display in the right frame of the screen. (The sections of the screen are fully described in the GMS Navigation section, on page 6.

Figure 4: Project Grid
Remember that only the records that match the access rights of the user will be displayed. In the above example, the user accessing this page has the rights to see all the projects in the GMS.
After selecting a project, this module has the heading Reports added to the left frame. There will be different reports listed depending on the status of the application. (These are explained in the GMS Navigation section on page 8.) Clicking on any of the options will display the respective report.
Project Grid Columns
The data in the Project grid is presented in three columns of information. These columns are:
|
Project Module Columns |
|
|
Column Title |
Definition |
|
Project # |
A unique number for the project. The components are described below. |
|
Participant |
Name of a group that is involved in the execution of the
project. |
|
Project Status |
Refers to the current standing of the
project. E.g., Application Received,
Under Review, Contract Executed |
Project #
The Project # indicates the Funding Program Type with the first two letters, the calendar year with the next two digits, a sequential number with the next four digits, the next digit (letter) indicates whether the application was submitted on line (E) or on paper (D) and the last two digits indicate the number of copies (See: Copying a Project) of this proposal, the highest number being the latest.
For example: CC04-1032-D00 project was funded by Capital Crimes with the initial year being 2004, it has a sequence number of 1032, it was submitted on paper and this is the first copy of the project.
And: AD05-1001-E02 project was funded by Aid to Defense with the initial year being 2005, it has a sequence number of 1001, it was submitted on line, and there are two copies of the project, i.e., it has had two amendment requests.
Accessing Specific Projects
GMS has organized the Project data into five sections or “tabs”; which are: General, Participants, Budget, Work Plan, Questions
The Project Module’s sections (tabs) are:
|
Project Module Tabs |
|
|
Tab |
Information |
|
General |
Has the title, dates of the
project, project number, DCJS number, etc.
about the project. |
|
Participant |
Lists the organizations which
will be taking part in
the project. Contact
information for individuals within the organizations is located under this
tab. |
|
Work Plan |
Contains the goals and their
objectives and the objectives tasks for this project. |
|
Budget |
Has the financial plan
information for the project. |
|
Questions |
Contains questions generated
when certain funding sources have been selected. |
To access a specific project, follow these steps:
ü Log in to the GMS.
ü Click on Project in the GMS Welcome page.
ü Click on the Project # (displayed in blue).
o The General Tab data for the selected project will then display in the right frame of the screen.
ü To view or enter data in another tab, click on that tab.

Figure 5: General Tab of the Project Module
Creating a New Project
Creating a project makes a new application for funding and is usually initiated by the applicant.
The Project Status will remain as “New” throughout the data entry process. The status will change on submission and the project will be locked to further data entry until approved by BJF or reopened for editing by BJF staff.
To create a new project follow these steps:
ü Log in to the GMS.
ü Click on Project in the GMS Welcome page.
ü Click on the New button at the bottom of the Project Grid. The right frame will refresh to show the Create Project button and a pick-list box for selecting the Funding Program.

Figure 6: Selecting a funding program while creating a new project/application.
Before reaching the tabs one must select the appropriate funding source:
Select Funding Program
ü Click on the down arrow in the pick list box for funding programs.
ü Scroll down with the mouse until the desired funding program is highlighted.
ü Click the left mouse button.
ü Click the Create Project button to start the creation of the new project.
ü Click the OK button on the dialog box to confirm the creation of the project.
The first screen will be the General Tab.
General Tab
The right frame of the screen will show the Project Header, the Project Tabs, and the data for the first Project Tab, i.e. the General Page. Notice that the Project # has been automatically generated and that the Project Status shows the project as being New.
ü Enter the Project data into the various data fields for the General tab. Most fields are self explanatory.
§ Required fields are: Project Title. Mandatory data must be entered before the record can be saved.
ü When done, click on the Save button at the bottom of the page or the Save option on the left frame.

Figure 7: General
Tab for the Project Module
Participants Tab
ü Enter the participant information by clicking the Participants tab. Click the Add Participant button to search for an existing participant.
o Either enter the name you wish to search for, click OK and a list of matching names will appear, if any. Click on the name of the partcipant you wish to add, select the type and it will be added to the project.
§ NOTE: The first participant will be added as a Grantee, the second as 'other'. You may click on the participants you have added and choose other participant types (Grantee, Implementing Agency, Other) from the drop-down list.
o Or just click OK and a complete list of participants will be displayed. Scroll down and click on the appropriate participant, click OK, if you wish to add that participant to the project, if not click Cancel.
ü However, if the participant is not in the data base you may add them by clicking on the New button on the screen that lists the participants.
§ Required fields are: Participant Name, Address, City, State and Zip. Mandatory data must be entered before the record can be saved.
ü When done, click on Save.
ü To enter the contact information for participants, use the drop down box under “Contacts for Participant” to select the new participant, then click the Add Contact button.
§ Required fields are: First Name, Last Name and Phone. Mandatory data must be entered before the record can be saved.
§ Add a minimum of one Primary, Fiscal and Signatory contact for the Project.
ü
When done, click on Save.
Note: GMS allows for multiple participants in a given project (such as the members of a collaboration or consortium). Please enter or choose contact data for only the Primary Participating Agency (Implementing Agency). Full contact information is not required for each collaborative member.
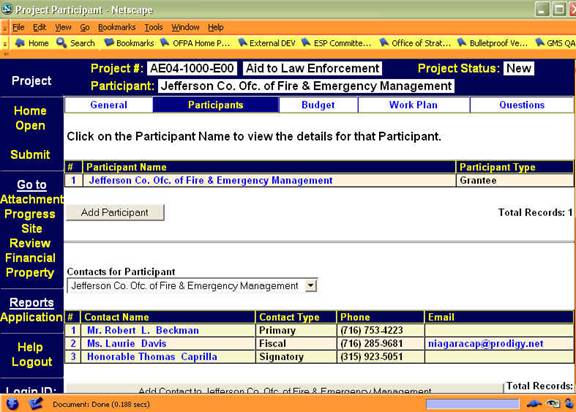
Figure 8: Participant Tab for the Project Module
Budget Tab
ü Click on the Budget tab, to enter budget information. You must have at least one participant before you can enter budget data. You may add separate budgets for each participant.
o The first time you enter a record the budget will be automatically assigned the number “1.”
ü Click on the Create new Budget Version for participant's name to add the budget data for that participant.
§
The
next screen displays the fields for the budget information required. There are nine budget categories: Personnel, Fringe Benefits, Consultant
Services, Equipment, Supplies, Travel and Subsistence, Rental of Facilities,
Alterations and Renovations, and All Other Expenses.
ü For that participant fill in the relevant categories.
§ For each category, the required fields are: Description, Number, Unit Cost, and Justification. Mandatory data must be entered before the record can be saved.
ü When done, click on Save. Repeat these steps as necessary to complete all needed budget categories.
ü Click Back to Budget Summary to see the completed budget, or to create a new budget for another participant.
ü
Repeat
these steps for each participant.

Figure 9: Budget Tab for Project Module
Work Plan Tab
ü Click on the Work Plan tab.
ü Enter the Project Goal in the appropriate box.
ü When done, click on Save.
ü To add an objective, click on the Create New Objective button and add the objective in the text box. Several objectives can be created.
ü When done, click on Save.
ü To add a task, click on the Add Task to this Objective button. Describe the task in the first text box. Provide specific performance measurements in the next text box.
§ Notice that both of these text boxes are mandatory fields. Mandatory data must be entered before the record can be saved. Several tasks can be created for each objective.
ü When done, click on Save.
Each
objective is listed separately with the relevant tasks below them.
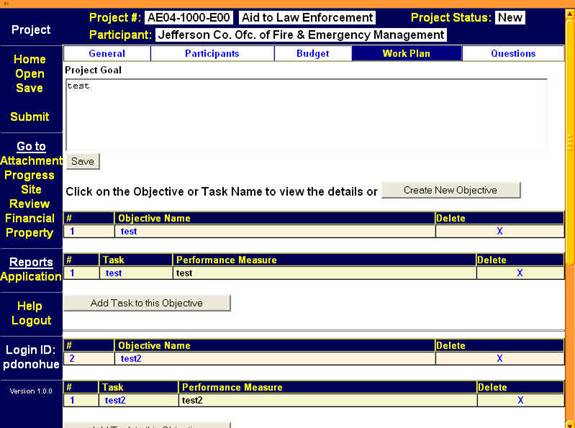
Figure 10: Workplan Tab of the Project Module
Questions Tab
When a funding program is selected
(in the initial step for creating a project) several questions may be generated if
required by that program. These
questions will be displayed under this tab for the applicant to answer.
ü Click on the Questions tab.
ü Click on the question link and enter the answer in the answer text box.
ü
When done, click on Save.
Submitting a Grant
The applicant can fill out the information on the project at leisure. GMS will save the data and allow the applicant to return to the application, until the application is submitted. To submit a grant follow the steps below:
ü
Log in to the GMS.
ü
Click on the Project option from the GMS main menu.
ü
Select the
project.
ü
Check that the
application is filled out completely.
ü
In the Attachments module,
add any attachments that are relevant to the project.
ü
In the left frame
under Save click on the word Submit. BJF will be notified of a new application and
all the fields will be locked to the grantee. If any required fields have been left
blank, GMS will generate a printable Required Fields Report to guide you in
finishing the application.
What to Expect After Submission
Following notification that a
grant application has been submitted, BJF staff will review the application for
completeness and, in the case of competitive grants, eligibility for
funding. BJF will notify the grantee to
edit and resubmit the application, if necessary, and areas requiring additional or
altered information (noted by a red-colored 'Deficiency' flag on the page or
module) will be reopened to the grantee for editing. The grantee may view the status of their
application or grant contract by simply logging into GMS and noting the status
indicated on the Project Grid for the project of interest.